This week at camp was Hawaiian week, and I got to make this delicious snack/dessert twice.
Ingredients
2 packages vanilla pudding
4 cups milk (about ¼ of a gallon)
1 can of crushed pineapple
2 packages of cream cheese, softened
½ a package of shredded coconut (about 2 cups)
Graham crackers
Maraschino cherries (optional)
2 gallon Ziploc bags
Directions
1. Mix pudding and milk in one bag. This is a guesstimation recipe, so exact amounts don’t matter as much. Shake/mush bag until pudding is a bit thicker (it will never reach pudding consistency).
2. Mix softened cream cheese, pineapple (drained), and coconut in another bag. Smush until thoroughly mixed.
3. Add pudding to the cream cheese bag, and smush until mixed.
4. Cut a corner off of the Ziploc bag and squeeze out and serve on graham crackers. If desired, add extra coconut and a maraschino cherry on top.
This recipe is easy and delicious! It looks a bit gross, but the taste will soon convince you otherwise. =)
Thursday, July 28, 2011
Wednesday, July 27, 2011
Interweave Crochet
So my friend bought a magazine called "Interweave Crochet", and I've spent a lot of time looking though it. This magazine is super awesome! It features tons of cool crochet projects, as well as articles on different types of crochet and crochet designers and reviews on products and crochet books. Although I haven't actually tried a pattern from the magazine yet, there are definitely plenty of patterns I want to try that go with my "I'm not going to make useless things" rule. I'm so smitten with the magazine I saw (the Summer issue) that I'm considering getting a subscription... or at the very least picking up a couple copies at my local bookstore. =)

Link to the website: http://www.interweavecrochet.com/
Monday, July 25, 2011
Never Been Kissed
I just finished reading a novel called "Never Been Kissed" by Melody Carlson. Although Melody Carlson is my favorite author, this book was targeted towards a younger age group. I enjoyed reading it, and although I thought the plot would be predictable, it actually took an unsurprising turn. This book is directed at high school students, and the main "issue" is sexting. I think it is an important message, and I love how Melody Carlson can get you into the mind of any character - she does the same thing with her "True Colors" series.
This book is about a girl named Elise who tries to carry on a secret relationship with a guy she likes and a sort-of relationship with a guy she sort-of likes in order to get kissed before her sixteenth birthday. This book explores the concept of cyber-bullying and touches on the importance of having God in your life.

This book is about a girl named Elise who tries to carry on a secret relationship with a guy she likes and a sort-of relationship with a guy she sort-of likes in order to get kissed before her sixteenth birthday. This book explores the concept of cyber-bullying and touches on the importance of having God in your life.
Here's a link to it on amazon.com.
Friday, July 22, 2011
Yarn Octopus
Materials Needed:
Stuffing
Yarn
Googly eyes or other craft eyes (optional)
Directions:
1. Take a handful of stuffing (about the size of your two hands put together) and “form” it into a ball.
2. Start wrapping yarn around the stuffing, in every direction, rotating the ball as you go. Continue until the whole thing is covered in yarn. Your ball will decrease in size during this step. This is the octopus’ head. Leave a six inch or so “tail” of yarn when you are done.
3. Cut 32 strings of yarn, about 6 inches long. I made my octopus with three different colors – 8 of each color.
4. Braid the yarns together to create eight “legs”.
5. Tie the “legs” onto the tail of the octopus, and slide the knots down until you are satisfied they are in the right place. Tuck the tail onto the head of the octopus
6. Add eyes if you desire.
Pictures coming this weekend!
Thursday, July 21, 2011
Mini S’More Craft
In Girl Scouts, they have something called swaps (short for Special Whatchamacallits Affectionately Pinned Somewhere) that are basically little homemade pins that you trade with other troops. The other day, I got the cutest one, and I wanted to share it with you.
Materials Needed
Tan or brown foam board
Brown felt
Cotton balls
Hot glue or tacky glue
Safety pin
Directions
1. Cut foam board into squares about an inch wide.
2. Cut felt into squares about an inch wide.
3. Use glue to assemble a ‘s’more’, stacking foam board, felt, cotton ball and foam board.
4. Stick a safety pin through it all, so you can stick it somewhere cute.
Pictures coming this weekend!
Wednesday, July 20, 2011
Peruvian Friendship Bracelet
This is an awesome bracelet – it is easier that some of the other ones, and it looks like something you would buy in a store. For this bracelet you need thicker string (5 mm?) such as the string you would use to make candles, as well as your friendship floss. You also need glue to finish off the ends.
For the typical bracelet, you need five lengths of friendship string as long as your ‘wingspan’. Three of the same color (Color A), and one each of other colors (Color B and Color C). You also need the thicker string – long enough to go four times around your wrist (actually you only need two, but I prefer to measure four – better too much than too little). Fold all lengths of string in half. Lay the loop at the end of the friendship strings over the loop of the thicker string. Pull the ends of the friendship string around the thicker string and pull them through the friendship loop, creating a slip-knot. Lay the entire thing so that the floss is on the left, and the thicker string on the left.
In normal ‘4’ formation, like you would with a diagonal friendship bracelet, use one length of Color C to make two knots on each of the thicker strings. Do the same thing with one length of Color B, and then with all of Color A, and the last length of Color B. With the last length of Color C, make two knots on the first thick string, and then one knot on the last. Then, using backwards knots (backwards ‘L’, such as the one you would use for a V-Pattern Bracelet), make one knot on the rightmost thick string, and then two on the leftmost string. Now, work backwards, making two knots on each of the strings in the opposite order you did last time. The last Color C string will do two backwards knots, one backwards knot, one forwards knot, two forwards knot. Continue working back and forth like this until you finish.
When you are done, cut the floss as short as you can to the thicker strings, and glue the tips to the bracelet. Some people recommend melting the ends of the thicker strings, but I’ve never done that, and it usually works out fine. Tie on however you would like.

A finished one

At the beginning

What it looks like when you're making it
Tuesday, July 19, 2011
Banana S'More
Time for another recipe! Well, sort of. This is another delicious dessert that our wonderful camp cooks introduced me to. I’ve never made it myself, but I’m fairly sure this is how it goes. Split open a banana, peel included. Stick pieces of chocolate inside the banana, and stick marshmallows on top of that. Stick prepared banana(s) onto a tray, and heat up in the oven, just until the chocolate and marshmallows are melted. Then, eat! You can use a fork (my preferred method), or you can just peel-as-you-go and eat that way. I love love love this snack. Also, after talking with my friends, you can apparently make this at a campfire too – just wrap the banana up in tinfoil and cook that way. Although don’t make a fire in Arizona right now – there’s a fire ban!
Monday, July 18, 2011
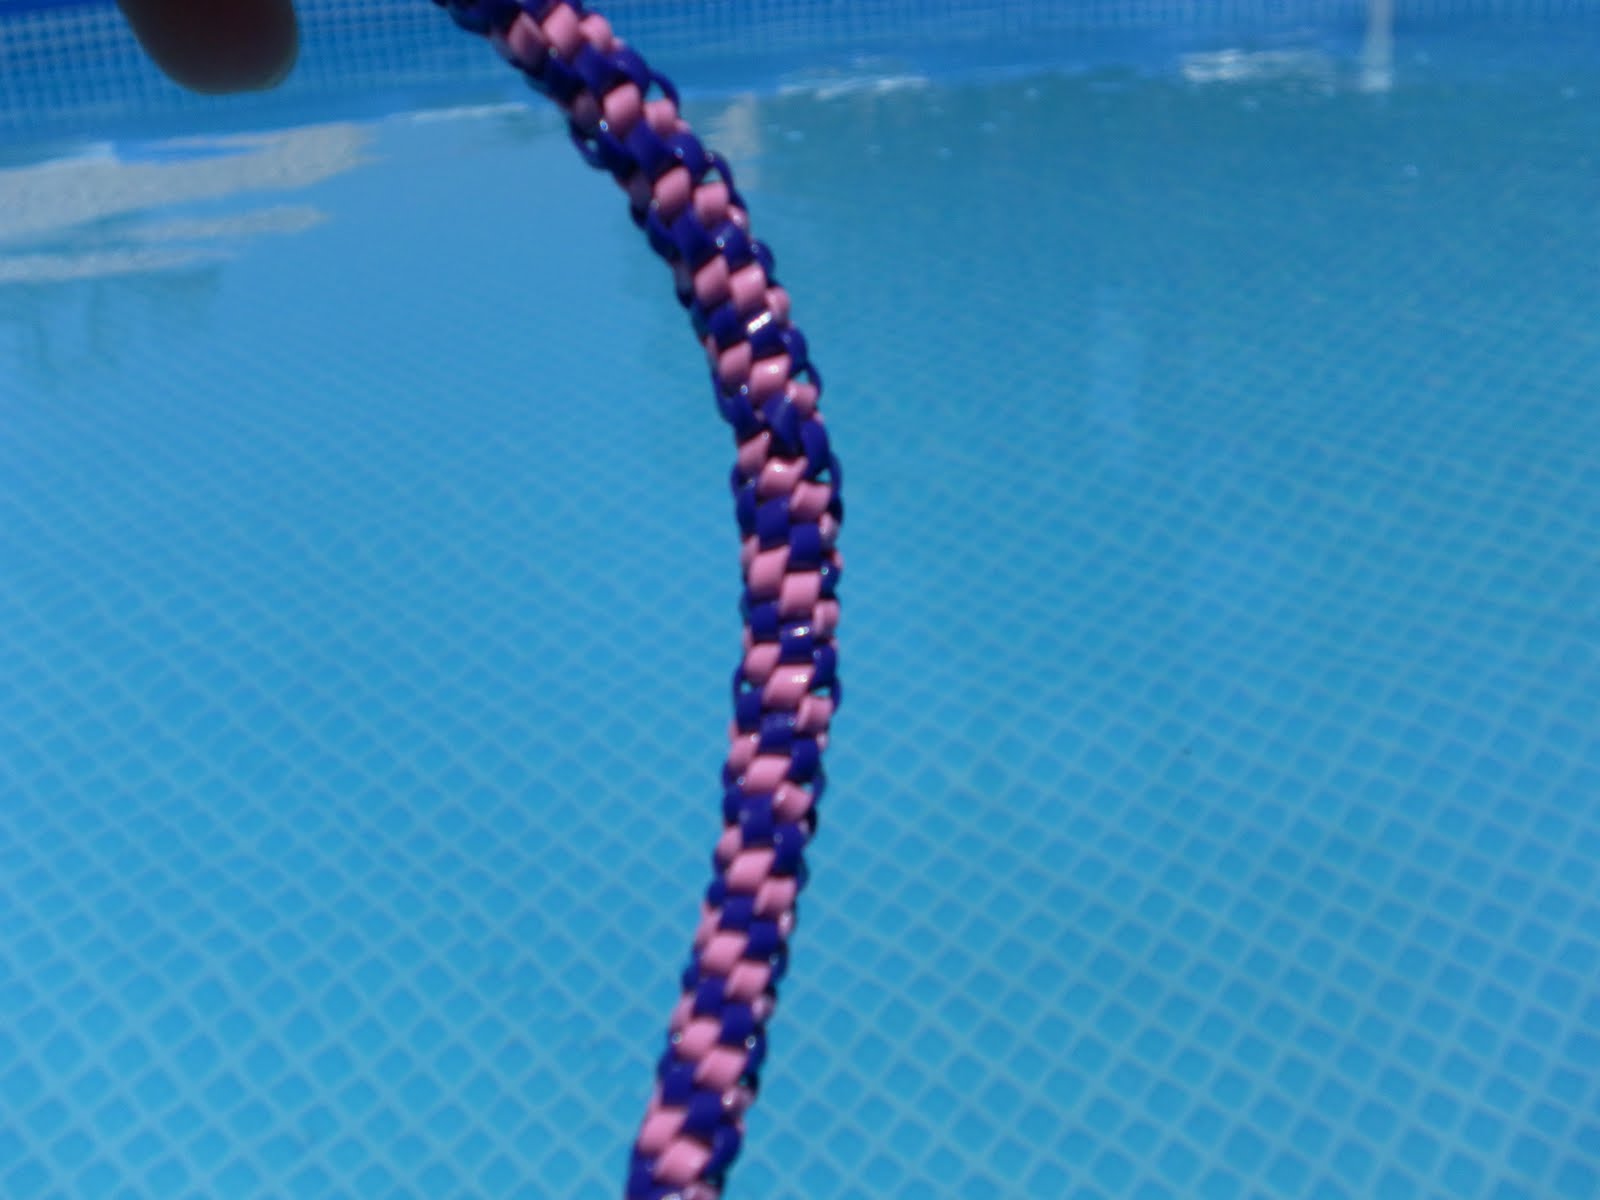
Big Lanyards!
I started with small lanyards and worked my way up. My favorite is the 2x1 lanyard, because it looks like two separate lanyards weaving around each other. I do every lanyard I do swirly now – the concept is the same. Just make sure that your two colors are always parallel and you should be fine. To get “funky” swirls, try a lopsided large lanyard, like a 3x1 or a 5x2 or something like that. To get just a fatty lanyard, make a not-so-lopsided one, like a 2x2 or a 3x3. I still don’t understand how they swirl, but they do, and that’s awesome!
![]()
![]()
![]()
![]()

This is a 3x3, I believe

The weave on a fat one

This is a 5x2

My personal favorite, the 2x1
Saturday, July 16, 2011
Double Take
This is another Christian chick-lit, this time by my favorite author, Melody Carlson. This book is about two girls with very different lives. Madison is a rich New York girl who is tired of the stresses of her life. Anna is an amish girl who wants to know what "modern" life is about. So when they meet at a coffee shop and discover that they look almost identical, they switch places for a week.
I loved reading this book. It is one of those relaxing reads that you know will have a happy ending, but is still super interesting the whole time. I read this one in a weekend, which is pretty impressive considering I work 22 hours a day. I would recommend reading this if you are looking for a great (young adult) summer read.

I loved reading this book. It is one of those relaxing reads that you know will have a happy ending, but is still super interesting the whole time. I read this one in a weekend, which is pretty impressive considering I work 22 hours a day. I would recommend reading this if you are looking for a great (young adult) summer read.
Here it is on amazon.com.
Thursday, July 14, 2011
Swirly Lanyard
Although this is super easy, it took me a while to figure out. But as soon as I figured it out, I had a lot of fun with it! Okay, so picture making the normal lanyard. Now, instead of putting the lanyard string where it normally goes, imagine putting it on the opposing lanyard string. Now imagine pulling it just past that. That’s where it goes “diagonally”. The opposing string does the same, and so do the over/under strings. Strings of the same color will always remain parallel – there should be no criss-crossing. Then, just keep going! The lanyards will swirl on their own.
![]()
Coming soon: Big lanyards!
Wednesday, July 13, 2011
Square Lanyard
This is the basic, standard lanyard. To do this, you basically are going to be weaving the lanyard strings. Take your up/down lanyard strings, and loop them over the start of your lanyard to make bunny ears. Then, weave the left/right lanyard strings in an over/under pattern. Pull tight. Continue until you have a full lanyard! Also, it doesn’t matter which color you make the bunny ears with. I promise.
![]()
Coming soon: Swirly lanyard

Lanyard made by one of my campers
Coming soon: Swirly lanyard
Monday, July 11, 2011
Fourth of July Cake
I know it’s a bit late, but every year for the Fourth of July, my family makes this awesome gelatin cake.
Ingredients
1 box yellow or white cake mix (and stuff to make it)
1 box instant vanilla pudding (and stuff to make it)
1 4-serving box of red gelatin mix
1 4-serving box of blue gelatin mix
1 tub of whipped topping
Directions
1. Bake cake as directed in a rectangle pan.
2. While cake is baking, mix each gelatin packet separately with ¾ cup boiling water and ½ cup cold water. Put them in the fridge to cool, but do not allow them to gelatinize. Pull them out of the fridge if necessary.
3. When cake is done and cooled, and the gelatins are cool as well, poke holes in the cake, about 2 inches apart, with the end of a wooden spoon.
4. Pour the gelatins in the holes – alternate red and blue, or whatever you feel like. You can also use all red gelatin if you can’t find blue gelatin.
5. Make pudding with the “for pie” directions.
6. Mix pudding with whipped topping.
7. Frost cake with pudding/whipped topping mix.
8. Cool until ready to eat.
9. Enjoy! I love this cake – easy to make and delicious.
![]()
![]()
Ingredients
1 box yellow or white cake mix (and stuff to make it)
1 box instant vanilla pudding (and stuff to make it)
1 4-serving box of red gelatin mix
1 4-serving box of blue gelatin mix
1 tub of whipped topping
Directions
1. Bake cake as directed in a rectangle pan.
2. While cake is baking, mix each gelatin packet separately with ¾ cup boiling water and ½ cup cold water. Put them in the fridge to cool, but do not allow them to gelatinize. Pull them out of the fridge if necessary.
3. When cake is done and cooled, and the gelatins are cool as well, poke holes in the cake, about 2 inches apart, with the end of a wooden spoon.
4. Pour the gelatins in the holes – alternate red and blue, or whatever you feel like. You can also use all red gelatin if you can’t find blue gelatin.
5. Make pudding with the “for pie” directions.
6. Mix pudding with whipped topping.
7. Frost cake with pudding/whipped topping mix.
8. Cool until ready to eat.
9. Enjoy! I love this cake – easy to make and delicious.

Pokin' holes and pourin' gelatin

Om nom nom
Thursday, July 7, 2011
Granny Squares!
I have decided to crochet an afghan - it gets chilly in Flagstaff. Plus, if I don't have room for it, I can always donate it. There are blanket drives all the time at my school since it is so cold in the winter. If I know how to make it, I can make it over and over and over again. Anyways, I found an awesome, colorful, easy but fun pattern at lionbrand.com. This website is awesome, since it has tons and tons of free patterns - you just have to sign up, which isn't much. Here's the link to the pattern I'm using: http://www.lionbrand.com/patterns/L0345B.html. In the end, I hope it will look like this, except with different colors (because I'm using the colors I have, maroon, pumpkin, mustard, sage green, navy, black, gray and white). And shh... I'm using a different brand of yarn. It doesn't matter as long as the yarn is the right weight - in this case, worsted weight.


This pattern calls for the use of... Granny Squares! I didn't know how to make them before, but now I do, thanks to this pattern. They're a lot of fun, and can be used to make lots of different things. Many patterns call for a bunch of granny squares sewn together. Here's a picture of my granny square:

Making a granny square requires these stitches - a slip stitch, a double crochet stitch, and a single crochet stitch. All of them are basic and easy to learn. The double crochet is my personal favorite, just because it's "complex", but not really - it's easy, and it creates a bigger stitch, which is satisfying. Crocheting overall is really easy - you don't need much to get started!

My granny squares - I haven't trimmed them yet.
Tuesday, July 5, 2011
Chicks with Sticks Guide to Crochet
Another book review! While starting up crocheting for the first time this summer, I remembered an awesome book with awesome patterns in it. This book, by Nancy Queen and Mary Ellen O'Connell, is how I learned to crochet. (Well, sorta. My grandma taught me first when I was younger, but I had since forgot). This book is great - it has easy-to-understand pictures, and I use it as my stitch reference. My motto for crocheting is "don't make anything you won't use". This book is really great for that, because it doesn't have very many useless patterns - things too ugly or impractical for normal life. I would totally recommend getting it. Here it is on amazon.com.

Saturday, July 2, 2011
Love Starts with Elle
Another finished book! This book, "Love Starts with Elle", is by the same author that wrote "Dining with Joy", Rachel Hauck. This book is a great summer/Christian romance for the young adult. I would recommend reading it before "Dining with Joy", since that book 'spoils' who she ends up with, but I read them out of order and still enjoyed both.
This book is about a woman named Elle who owns her own art gallery and is suddenly proposed to by her boyfriend Jerehmiah. Throughout this books she has to deal with finding confidence in her passion for art, her sisters, new neighbors and praying with Miss Anne. And this book is much better than I just made it sound...

This book is about a woman named Elle who owns her own art gallery and is suddenly proposed to by her boyfriend Jerehmiah. Throughout this books she has to deal with finding confidence in her passion for art, her sisters, new neighbors and praying with Miss Anne. And this book is much better than I just made it sound...
The picture is from amazon.com.
Subscribe to:
Posts (Atom)